Transporting the Sony UP-DR150

Chances are that if you are using a Sony UP-DR150 you are using it on the go. Here are some tips on how to transport or ship your dye-sub printer and protect your investment.

Below are the two most common issues caused by not removing the media prior to transporting or shipping a Sony UP-DR150 printer and possible fixes.
1. Door locking pin alignment

Illustration 1

Illustration 1

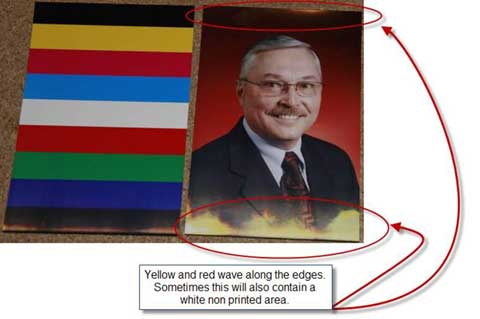
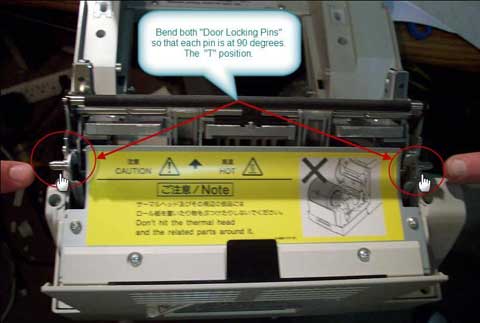
Description: images will have a missing color, white space, or a colorful effect on the outer edges of each photo (see illustration 1.) This occurs when the door shifts during transport resulting in bent door locking pins. If either or both of these pins are bent, use a set of pliers to carefully realign the pins to an outward “T” position (see illustration 2).

Illustration 2

Illustration 2

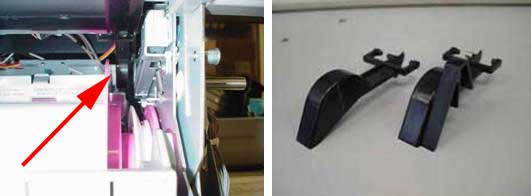
To prevent this from happening remove media prior to shipping. Secondly, tightly wrap the printer with tape or strap to hold the door shut to keep it from shifting during transportation (see illustration 3).

Illustration 3

Illustration 3

2. Error Code: “Media Mismatch”
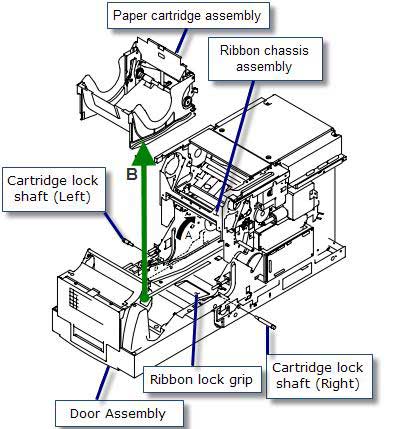
If after shipping a printer you receive a media mismatch error when loading 4×6 ribbon and paper (2UPCR154), it is possible that the paper size arm was damaged (see illustration 4).

Illustration 4

Illustration 4

If the paper size arm is damaged,  the printer will be unable to print using 4×6 media and you’ll have to replace the arms. To replace the paper size arm, follow the procedures below (refer to illustration 5):

  1. Open the door to the printer.
  2. Remove the left and right side panels.
  3. Remove the cartridge lock shaft (L) and cartridge lock shaft (R).
  4. Release the ribbon lock, then raise the ribbon tray.
  5. Remove the paper cartridge assembly in the direction of the arrow B.
  6. Once the tray is out of the way then you should be able to add the paper width arm as shown in illustration 3.

If you have any questions please don’t hesitate to call or send me a note.
-Russell

Illustration 6

Illustration 5

Did you enjoy this post? Why not leave a comment below and continue the conversation, or subscribe to my feed and get articles like this delivered automatically to your feed reader.

Comments

Great info I get an error saying “check paper and ribbon”
after loading new paper and ribbon and replacing a paricall use paper and ribbon from a working unit.
I hope this will fix the problem.
kindest regards
Zip

Rusell and the team, you’re awesome. I have used both of these fixes after my printer “jumped” out of the back of my truck and they were both well described and easy to follow. I appreciate all your hard work and wealth of knowledge.

Sony UP DR150 printer question?
How do i repair the printer when it gives me deep scratches on one or both vertical edges of the 4×6 prints?
on 5×7′s no scratches show up.
kindest regards
Zip

Zip…it really depends on what is causing the problem. It could be as easy as cleaning the print head and all the rollers and guides. However, it sounds like you probably have a more serious problem that might involve replacing the movable guide, the metal blade beneath the thermal head, or the head itself. Hope that helps…

My question:
What is the differense between the Sony UP-DR 150 printer old 5 digit SR# vs the newer 6 digit SR’s
kindest regards
Zip

“Sensors” Where are the sensors on the UP-DR 150 printer?
I purchased a Sony DR100 a while back after the seller notice his pictures were foggy & dull.
I notice he had use it in a dusty area clean and blew it out, took a Q Tip dip in achol and clean the small pin hole sensor near the printer head and it printed great.
I look but did’nt notice any visuable sensors N just wondered if I over looked them???
kindest regards OH quick note after reading your posting I repaired two printers in which my photo buffs would have paid hundreds to get theirs repair.

Hi Zip, The Black tagged printer is a version 4, and the 5 digit red tagged printer is a version 1.

Version 1 printers are 5-digit serials
Version 2/3 printers are 100,000-699,000
Version 4 700,000 and up

It is purely my opinion, due to design modifications that the version 4 is better since it was the latest model of the UP-DR150.

Sony is very innovative and were modifying this design along the way… Here are two examples…
• The gear teeth within the ribbon drive assembly were changed to from plastic to metal.
• The stopping tabs that catch the movable guide were relocated to the back of the frame, rather that bendable tabs on the sides.

Is it possible to send me samples of the scratched images?

If I had to guess over an email….Chances are …the scratches are not showing up because they are concealed by orientation of the printed photo.
This is not so easy to diagnose over an email. I’d want to see samples to be certain.

Possible solution1: Clean the printer rollers and thermal head or replace the movable guide.
Possible solution2: There could be debris within the paper path (Replace the movable guide- ….$400)
Possible solution 3: Replace the Blade that is attached to the door beneath the thermal head. $100 for the part (see illustration)

If this is the case, then the metal blade just beneath the thermal head is chipped.
The small orange arrows are where the chips or burrs could be.

My UP-DR150 fell off a trolley (just a few inches) onto its side. I now get “Check Paper & Retry” error. When I go into the information error logs it tells me there is a “feed position error”.If I attempt to print a calibration print, yellow is printed and then retracts, never to be seen again and the “Check Paper & Retry” error comes up. What, if anything, can I adjust to re-align the feed position?

Paper will not load in my UPDR-150. Is there something I can do besides ship it to Sony in Texas so they can look at it for $700?
Thanks for posting these solutions. They help when Sony will not.

Jan,
Let us know how Russel’s solution worked out for you.
Cheers!

Cleaning the rubber rollers with Snap Swabs fixed the problem. Snap Swabs infuse alcohol from a 3″ sealed straw onto a 3/8″ x 1″ double sided foam head. The straw then works as a handle. The literature with the Snap Swabs advised cleaning when installing a new roll of paper or when streaks appeared on prints. Good to know it cures this problem also.

[...] Related article: Transporting the Sony UP-DR150 [...]

I’m having an issue with my printer running out of paper even though the roll isn’t empty. I have to try reloading the paper a dozen times before it will catch. Even then, it’ll usually work for 2-3 prints and then “run out of paper” again. Every once in a while when I reload it just right, it’ll work properly until I turn it off or move it, and then it’s right back to square one. I appreciate your help. Thanks!

This really helps.
I ship these printers all the time now that I wrap it I get less broken printers.

My prints have been coming out with one color a fraction of a milimeter off center. For instance, if the red is off, the print will have a red hue and text will look like it has a red shadow. Sometimes the prints will come out perfect, sometimes the yellow is off, sometimes the red is off. I’ve cleaned the printer and done all the fixes suggested in this forum.
I’ve heard it might be the paper ever since the tsunami affected the film supply, but it seems like a hardware problem to me.
One other thing, it sounds like the printer makes a different noise when it processes bad pictures, but that could just be my imagination.
Any suggestions would be greatly appreciated

Stan,
Feel free to call us and request a phone call from one of our printer techs.
Thanks

Stan,
If your prints look like they are 3D your printer is out of registration. That is a hardware issue (transport mechanism). Please contact me at tech support 800.342.9294.
Bill

All new problem – The ink ribbon is sticking to the image burner. I get a “check paper and ribbon” error message and when I open the printer the ribbon is stuck onto the burner to the point that the ribbon is sliced. I’ve cleaned the burner and tried a couple different ribbons. I’ve also tried the ribbons in other printers and they work fine. Any suggestions?

I have a paper size arm that popped out. It doesn’t look broken at all – the small black plastic piece (on the right in photo above). Is it easy to pop back in following the steps above? The diagram doesn’t seem to clear on where this thing goes. Can I be talked through it on the phone, perhaps?

I have developed white lines on the extreme right edge (As printed)3mm wide on 4×6 prints after switching from 5×7 paper that had no issues. I’ve cleaned all rollers, print head etc, and checked pin alignments on the front door. If anyone can help me diagnose this- I’d appreciate it. The machine has 30K prints on it and has been error free.

Because the heads are 6″ wide, when you print 5×7 media it does not use the last 1/2 inch on both sides of the head. If you only use 5×7 media it will eventually rub a groove into the print head that can show up when you print 6″ media, 1/2″ in on both sides.
You can replace the head (about $450), just print 5×7 or at your own risk, try cleaning the head with Brasso.
Hope that helps.
Bill

Thanks Bill for the help – I can’t seem to locate a place for a head replacement. Any ideas?

Where can I purchase the paper size arms because my printer is giving me the media mismatch error?

Cale,
Please call Thomas at 800.342.9294. He is the repair and refurb manager here at ISI.

Leave a comment

(required)

(required)